Interaction Design presentation video Final
Posted: May 12, 2015 Filed under: Second Year - Field - Interaction Design | Tags: interaction design, plush, rumble bee, rumblebee, toy, video 1 Comment
to see the earlier (longer) edit of this video, click here
to see the “Rumblebee reactions” video, click here
After making the first video, I realised that there were several flaws with it. Firstly, the video was far too long (although I made it purposely 2 minutes 30 seconds as that was the brief I was given), and if I were to make a video that long again I would certainly film more shots and perhaps add a more involved narrative. Before starting this project I didn’t have any real concept of how long time was in terms of filming, and something that you feel takes a long time to film and will fill a good portion of the video, may in fact turn out to feel very short or have to be shortened in order to fit the tone or rhythm of the film. I have definitely learnt that when filming I should aim to film at least twice as much footage as you think you will need. Another problem was that feedback from people who had watched the first video commented that it could be interpreted as being sexual, which is the absolute last thing I wanted! I expect this is also down to the lengths of some of the stroking shots, and I found that shortening the video, as well as changing the wording of some of the text has helped (I hope) eliminate that problem.
Ideally, I would have liked to film the video again from scratch with the knowledge that I have now, and I found it frustrating having to work with only the shots I took originally and being able to see all the flaws in them (such as the camera being at a slight angle, the footage being grainy due to the lack of light), but at this stage in the project I don’t feel I have the time to be going back and redoing things simply because I’m being picky, and I think the final video itself is of a good enough standard that I can leave it be.
I think the video editing more than anything has been the part of this project that I have taken forward the most, while I would like to have a better range of skills with actually making interactive projects and arduino, and I am still aiming to use arduino in two of my projects, it is the video editing where I have been able to focus the majority of my efforts. I find it really interesting how it gives your object a completely different platform to be engaged with, and rather than having made an object and have others look at or interact with it in order to judge it, they are shown it within a specific context and narrative which you dictate. In this context, the object I have created is viewed in a consumer context, as a product which may be sold rather than a more artistically focused piece. Certainly from the reactions I have had with people interacting with it, it fulfils the purpose that I designed it for, to foster and encourage happy and affectionate interactions between the user and the object, with it being treated almost as a pet or a baby. This is created not only by the shape, but greatly reinforced by the sound, and most people very easily seem to adopt it very quickly. There were those who were very hesitant and confused around it and didn’t know what it was they were “supposed to be doing with it”, but I am inclined to say that these are a demographic of people who are not likely to be playing with cuddly toys and there will always be people who don’t react positively to a product or a piece of work.
Rumblebee reaction video
Posted: May 12, 2015 Filed under: Second Year - Field - Interaction Design | Tags: interaction design, plush, rumble bee, rumblebee, toy 3 Comments
Video editing (the joys of)
Posted: May 12, 2015 Filed under: Second Year - Field - Interaction Design | Tags: bee, interaction design, plush, plushie, rumble, rumblebee, toy, tribble, video Leave a commentI decided to go back to an earlier piece of work for my field Interaction Design, and re-edit the video I presented in order to make it smoother, now that I know it doesn’t need to be precisely 2:30. As well as re-editing the final video, I decided to also put together a video from clips I took of people’s reactions to the toy in order to judge whether or not it was getting the reaction I wanted.
To watch the videos, click here for the “Rumblebee Reactions” of people’s response to the toy, and click here for the final edit of the presentation video.
While I must say, I do overall really enjoy video editing and it is a new skill that I otherwise would never have touched, it can be extremely frustrating and monotonous at times. I imagine that with experience and learning to use the software better (I am using iMac) then things can probably be done much easier and quicker, but I found lots of things finicky and repetitive. However overall I find the process very satisfying and rewarding, and I would definitely like to make videos of my work again in future.
It’s easy to look at the finished videos and assume that it’s a fairly straight forward process, especially with the reaction video, and that I’ve simply strung a few clips together and put some music to it. Unfortunately it was far from that simple.
 We begin with an unedited video clip. Many of my clips I now realise were filmed in portrait, because when I was filming (and having had no experience with making videos) it made sense to me to hold the camera in the way which framed the subject best, as you would taking a photograph. I failed to take into account that videos are of course always displayed as a landscape view. This means that almost all of my clips would have to be rotated and cropped. Not only does this cause much more work for me, it comes with issues of reduced quality from the zoomed in shots, and trying to account for the new frame with the crop. I have certainly learnt the value of trying to get the best shots you can while filming, rather than relying on editing.

Once you’ve rotated the video, you then have to crop it, that is unless you want the actual proportion of footage:black screen to be very small. But as I said earlier, this brings up the issue of framing. When filming in portrait I had accounted for the frame, and gotten everything I wanted (reasonably) cleanly in shot. But now with half the height to work with, it makes it much easier for things to move off screen.
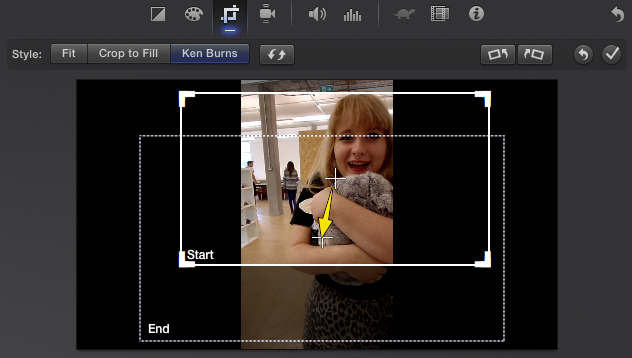
I did find a feature called the “Ken Burns” crop, which allowed the camera to move/pan from one part of the frame to another between a starting and ending point. While this was reasonably useful, I would have liked to be able to be more precise, moving the camera up/down/left/right between a shot. I am fairly sure there must be a way of doing this, as it seems like a glaring oversight not to have it, and I expect it’s down to my lack of experience that I can’t figure out how to do it. I did try to break the video clip into sections where I wanted to change camera directions, but I found I couldn’t accurately line up the end point of clip A with the start point of clip B seamlessly, and so it would jolt from one to the next which was more distracting than the framing issue.

The main thing I spent my time doing, was editing the audio. When importing an unedited clip, you are presented with this, and the audio file is attached to the video. All that you can do at this point is crop it with the video, and it took me a long time when I was making my presentation video to figure out how to do anything with it.

First I had to go to the menu and detach the audio from the sound clip

This then places the audio in a separate bar parallel to the video clip, which can then be trimmed, moved and edited in all manner of ways. I spent a lot of time trying to edit myself out of the clips as much as possible, not just because I didn’t like my voice but I didn’t want it to get in the way of people’s reactions. Rather than each clip having a full audio track, I edited it down so that it only had a few chunks of audio, usually where the person is speaking or the toy is making noise.
As well as trimming the tracks to remove myself, background noise was also a big problem. The studio in which we work is a large open floor and therefore often full of noise. I did various things to try and remove this from the audio, including have the “Reduce background noise” option turned up to max, and play with the audio levels.
 Editing the audio levels was also an important part of trying to make the video run smoothly. After removing much of the audio on each clip, when the sound did start it often sounded abrupt as it was coming from silence. As well as this there were often parts that I wanted to be louder than others, or louder/quieter than they were in the original recording. For example, in many parts of the film you can hear me laughing, and although I have removed as much of that as possible there were areas where it wasn’t possible to remove it as I am laughing over a noise I want to record, such as somebody speaking or the toy making noise. In this situation I then had to break the audio up into chunks, lowing the volume of my laugh and increasing the volume of the noise I’m trying to capture to make it more clear.
While all of this is tedious, by far the most frustrating part of the editing was the music. iMac had a good number of copyright free music to use on the videos, which I felt suited my theme. However, the issue was trying to make the music loop, as each track only lasted 1 minute. You would imagine it would be as simple as putting the track down a second time, but you need to take into account that each track as a beginning and an end sequence. After removing those sequences it’s then the tedious matter of finding two points where you can join the track together in a reasonably seamless fashion. Again, I imagine that there is an easier way to do this, or perhaps some way to fade in one audio track to another, but I could not find it and it was simply a matter of trail an error, and listening to the same song over, and over, and over again. In fact at the end of two days straight editing I have to say I have a blistering headache.
Another frustrating point was the title overlays, which had surprisingly few options it forced you to pick between. For example, you could have text fade in to the bottom left of the screen, but not the top left. Or certain choices would constrict you to only being able to type in capitals, only in a certain sized font etc. This made it difficult to get a consistent aesthetic across both the videos, but I managed to settle on a typeface and format that worked at least satisfactorily.
Overall though I must say that I am very happy with the results, and I certainly feel that coming back and re-editing the initial video has improved it. I think if I was going to do this project again I would have a much clearer idea of what it was I needed to film in the first place, and the shots which I would need to get, which was the only downside to the re-edit as I was working with the limited shots which I took initially.
Interaction Design – “Rumblebee” video
Posted: December 18, 2014 Filed under: Made objects, Second Year - Field - Interaction Design | Tags: artist designer maker, bee, CSAD, interaction design, interactive, plush, rumble, rumblebee, toy, video 4 Comments
Interaction Design: Making object
Posted: December 12, 2014 Filed under: Second Year - Field - Interaction Design | Tags: CSAD, hand made, handmade, mameshiba, mameshibas, plush, plushie, toy Leave a commentThe brief I have chosen for this project being to create a device that the user interacts with without a screen, and so what I have decided to make is a plush toy which reacts and responds to the user’s touch and presence.

I decided to base the shape of my object around my tiger bean Mameshiba plush toy that I own. I find the shape of Mameshibas to be perfect to encourage people to hold and cuddle them, which is the reaction I want for my own toy. By looking at the shape and the Mameshiba’s seams, I tried to deconstruct the pattern so that I could then cut it out for myself.

I cut the pattern out of some cheap fleece fabric that I had, to test out whether it was right and get a sense of what it was like put together without having to waste my expensive fur fabric.


This is what it looked like pinned up and filled with stuffing, I was happy with the size and shape but through doing this I found a few small areas where the pattern needed to be revised.


Using the first attempt’s pattern as a guide, I traced the revised outline onto the fur fabric

The outline didn’t show up too well on the camera, so I’ve made it a bit clearer by going over it in MS Paint

So now we have our final template of the pattern, I just have to sew it all up!

So now I have a.. fluffy little cocoon creature? It’s certainly great to hold and cuddle, but I decided it needed some features to make it more relatable. I decided early on in the design process that I didn’t want it to have a face, as I think that leaving it blank allows the user to project their own personality onto it more. Having looked at a wide variety of plush toys for my own amusement outside of research, I am very aware that what one person may find adorable, can be really offputting to another. For example, I personally love Mameshiba faces, but I know many people with whom they do not appeal to.
I decided that the creature needed ears. This is most likely also influenced by my love of Mameshibas, but I wanted it to be distinct enough that it would not be confused for one.

short ears

medium length ears

long ears
I felt the long ears were the best option, and gave the object a nice playfulness with something that is distinct and loose from the body. I also imagine that if I were to make more of these, that each one could have a different colour or patterned ears, with the body remaining the same.

The final product! or at least the prototype. It currently has no functionality beyond being soft and cuddly, but it does that pretty well. Suffice to say I am very happy with it
Interaction Design: design sketches
Posted: December 10, 2014 Filed under: Research, Second Year - Field - Interaction Design, Sketchbook | Tags: CSAD, digimon, interaction design, mameshiba, numeneko, plush, plushies, sketches Leave a commentLooking at the idea of creating an interactive object without a screen, I very much want to create a soft toy that is easily held and encourages the user to act affectionately towards it. In terms of size and shape I am very much influenced by mameshibas (of which I own many) as well as many other soft toys I have seen which follow the shape formula in terms of being handheld, and an inoffensive round shape

Using this principle as my starting point I began to create some sketches


I decided from the beginning that the object should not have a face, as I think it can be a very divisive point in terms of whether or not people find it appealing.

This is a more Westernised style cat face, which personally doesn’t interest me at all and I would never consider buying or interacting with

This, while being almost the same shape appeals to me much more, although not as much as the mameshibas

“numeneko”s, another brand that appeals to me, but for some reason less so on a small scale

a large scale numeneko, which I like an awful lot more than the smaller standard size
Because of this I feel that leaving the face blank is the safest bet, although it is important to frame the “face” with other features to that the user knows that it is a creature and interacts with it as such, rather than just a formless blob.

I also played with the idea of the creature having a tail. While I do like the idea of the main body having something loose that dangles freely, I decided against it in the end as I worried that if it wasn’t done correctly it would detract from the object rather than improve it.
I think this is probably subconsciously influenced through digimon and pokemon while I was growing up

Tai and Koromon from Digimon

fresh level digimon, all characteristically round and squishy

Joe and Gomamon from digimon
I like the idea of the weight and hanging of carrying a creature with limbs

Some combinations of ears and tails
